How to get Old Right-click Context Menu on Windows 11
Here are the main methods to get back the old right-click context menu on Windows 11: Let us now discuss the above methods in detail!
1] Use Show More Options to get the old right-click context menu
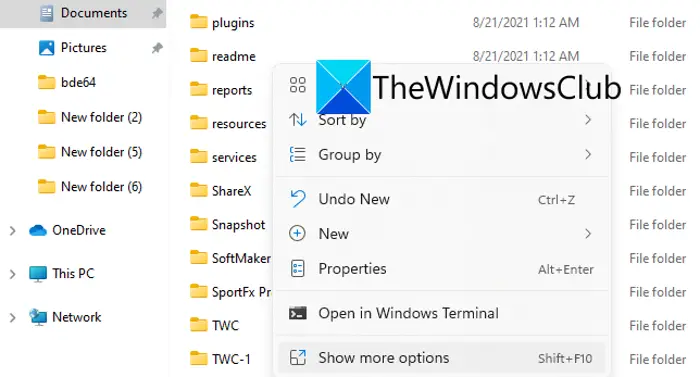
You can use Show More Options from the new right-click context menu in Windows 11 to get the old right-click context menu. All you need to do is right-click on a file, folder, or desktop and then press the Show More Options option. This will open up all the old context menu options including options related to third-party apps.
If you want to quickly open the old right-click context menu, select the item, and then press the Shift + F10 key combination. There are some more options to switch to the old context menu in Windows 11. You can check them out below. Read: Remove Show More Options entry from Windows 11 Context menu
2] Try Registry hack to get old right-click context menu on Windows 11
You can also use a Registry hack in order to switch back to the old classic right-click context menu on Windows 11. There are two ways to edit Registry, Manual and Automatic. Let us check out both these methods in detail now. Before you try this method, we recommend you to backup your Registry to be on the safer side. Read: How to get Windows 10 Explorer & Context Menu back in Windows 11
A] Manual Registry Edit
You can manually edit the Registry to get the old right-click context menu in Windows 11. Just go to the required key and edit its value. Here is the step by step procedure for doing that: Firstly, press the Windows + R hotkey to open the Run dialog box. Now, type regedit in it and press Enter to open up Registry Editor. Next, in Registry Editor, navigate to the following key or address from the address bar: Now, check here whether there is a key with the {86ca1aa0-34aa-4e8b-a509-50c905bae2a2} name or not. You will most probably not find this key here. So, you will need to manually {86ca1aa0-34aa-4e8b-a509-50c905bae2a2}.
To create a new key, right-click on the empty space in the left-side panel or on the CLSID key from the left panel, and then select the New > Key option. A new key will be created. Right-click on the newly created key, select the Rename option and name it {86ca1aa0-34aa-4e8b-a509-50c905bae2a2}. After that, you need to create a sub-key under the above key ({86ca1aa0-34aa-4e8b-a509-50c905bae2a2}) that you just created. For that, simply right-click on the newly created key, and from the appeared context menu options, click on the New > Key option and name the key as InprocServer32. Next, from the right panel, double-click on the Default string.
In the opened dialog box, make sure the Value data field is blank and press the Enter button.
Finally, close the Registry Editor app and then restart your PC. If you don’t want to restart your PC, you can also restart Windows Explorer to save and apply changes. For that, open Task Manager by clicking on the Ctrl + Shift + Esc hotkey, select Windows Explorer under the Processes tab and hit the Restart button. You can now right-click on desktop or File Explorer and see your old context menu back.
B] Using .reg file
To change to the old right-click context menu in Windows 11 using the Registry hack, you don’t need to go through different keys and manually edit everything. Just create a registry file with specific commands and run the file to automatically edit Registry. Here are the main steps you need to follow to do that: Let us discuss the above steps in detail now! Firstly, open the Notepad application on your Windows 11 PC. Now, you need to enter the Registry version followed by the relevant registry keys and their values. You can simply copy and paste the below code for that: Now, save the Registry file and for that, click on the File > Save as option. Then, select the Save as type to All Files and then enter the filename followed by the .reg file extension. This will create a registry file. After that, simply run the create registry file by double-clicking on it. Finally, restart your computer to let the change reflect. You will now get back to your old right-click context menu.
3] Use Ultimate Windows Tweaker
Download and use our freeware Ultimate Windows Tweaker. Run it as admin and apply the Restore Windows 10 Styled Context Menu tweak. You will find it under the Customization > Windows 11 tab. Read: How does Dynamic Refresh Rate feature work in Windows 11
How to switch back to the new context menu in Windows 11?
If you ever decide to switch the old context menu to the newer one in Windows 11, you can do that too. Just follow the steps we mentioned in method (A). Open Registry Editor, navigate to the key address we have mentioned, and then delete the key named {86ca1aa0-34aa-4e8b-a509-50c905bae2a2}. That’s it!
How do I show more options in Windows 11?
To show more options in the context menu on Windows 11, you can use the above-mentioned methods. In addition, you can also use the Options function in the File Explorer. Here are the steps you need to follow to do that: File Explorer will restart and you will get more options in the context menu of files and folders. See: How to open Windows Tools in Windows 11
How do I change the Refresh menu in Windows 11?
The Refresh option is now present under the Show More Options entry in the context menu on Windows 11. So, just right-click anywhere on the desktop and then select Show More Options. You will be able to see the Refresh option. However, we don’t know of any method to change or move the Refresh option. As soon as there is a method to do that, we will bring it to you. Hope this helps! Now read:
How to Download or Change Windows 11 wallpapersHow to decrease the space between the items in Windows 11 Explorer